Contents:
Installing Your Modem
Dialing, Answering, and Hanging Up
Controlling Result Code Displays
Accessing and Configuring the Courier 56K Business Modem Remotely
Handshaking, Error Control, Data Compression, and Throughput
Displaying Querying and Help Screens
Dedicated/Lease Line and Synchronous Applications
Appendixes
Fax Information for Programmers
Courier 56K Business Modem Command Reference
Installing Your Modem
To install your Courier 56K Business Modem, do the following three simple steps:
- Configure your Courier 56K Business Modem with DIP (dual in-line package) switches
- Connect the cables
- Install the drivers
Step One: Configuring with DIP Switches
Depending on how you plan to use your modem, you may need to change your DIP switch settings. See the “Configuring your Modem with DIP Switches” section of this guide for more information. The DIP switches 3, 5, 8, and 9 are in the on (down) position. (The DIP switches are located next to the phone jacks on the bottom of the modem.)
Step Two: Connecting the Cables
Note: If you plan to connect your Courier 56K Business Modem to a mainframe computer or use your modem to dial in to a mainframe computer, you will find more technical information on the Installation CD-ROM that comes with your new modem.
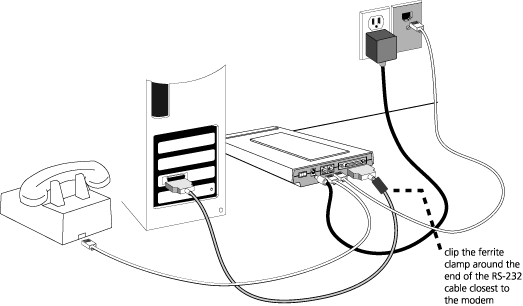
- Make sure that your computer is turned off before you begin installing your new modem. Connect the RS-232 modem cable to the back of the modem and to your computer’s serial port. Clip the ferrite clamp around the end of the RS-232 cable that is connected to the modem.
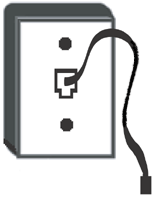
- Plug one end of the included phone cord into the
 jack on the back of the modem and plug the other end into an analogue
telephone wall jack. If there is another phone jack on your modem, you
can use a telephone by plugging the telephone’s cord into the modem’s
 jack. Plug the power
adapter into the modem’s
  jack and into a surge protector or electrical outlet. Make sure to use
the power adapter that came with your modem, as others may be of different
voltages and could damage your modem.
Turn on the modem by pressing the button on the back of the modem. The CTS and MR lights should illuminate.

- If the CTS and MR lights do not illuminate or other lights illuminate, make sure that only DIP switches 3, 5, 8, and 9 are in the on (down) position. (DIP switches are located on the bottom of the modem.)
- Turn on the modem.
To find the serial port on the back of your computer, look for COM, MODEM, RS-232, IOIOI, or SERIAL. Do not use the AUX, GAME, LPT, or PARALLEL ports.
Step Three: Installing the Drivers
Windows 95
Turn on your computer. When the Update Driver Wizard appears, insert your
Installation CD-ROM into your CD-ROM drive and click Next. When
the driver is found, click Finish to complete your installation.
Windows 98
Turn on your computer. When the Add New Hardware Wizard appears, insert
your Installation CD-ROM into your CD-ROM drive and click Next.
Select Search for the best driver for your device (Recommended)
and click Next. Select CD-ROM drive and click Next.
When the driver is located, click Next. Click Finish to
complete your installation.
Windows 2000
Note: Windows 2000 users must be in administrator mode to properly add any new hardware.
Turn on your computer and log in. Windows will detect your new modem and automatically install it, then you must update the driver. Insert the Installation CD-ROM into your CD-ROM drive. Click Windows Start and Control Panel. Double-click System, click the Hardware tab, and click Device Manager. Click to expand Modems, and double-click Standard Modem. Click the Driver tab and click Update Driver. When the Upgrade Device Driver window appears, click Next. Select Search for a suitable driver for my device (recommended) and click Next. Select CD-ROM drives, click Next, and then click Next again. A Digital Signature Not Found warning may appear. If it does, click Yes*. Click Finish to complete the installation.
Windows NT
Note: Windows NT users must be in administrator mode to properly add any new hardware.
Turn on your computer and log in. Click Windows Start, point to Settings, and then click Control Panel. Double-click Modems. When the Install New Modem screen appears, click Next to have Windows detect a standard modem. Click Change. Click Have Disk. Insert the Installation CD-ROM into your CD-ROM drive. Type D:\ and click OK. If your CD-ROM drive uses a different letter, type that letter in place of “D”. Select U.S. Robotics Courier V.Everything EXT and click OK. Click Next. Click Finish to complete the installation. When you see the Modems Properties tab, you will see the COM port that is assigned to your modem. Click Close. If the System Settings Change window appears, click Yes to restart your computer. When the installation is complete, you may close any open windows.
Windows Me
Turn on your computer and log in. Windows will detect your new modem and
automatically install it, then you must update the driver. Insert the
Installation CD-ROM into your CD-ROM drive. Click Windows Start,
point to Settings, and click Control Panel. Double-click
System. Click the Device Manager tab. Double-click Modem
and highlight Courier V.Everything EXT PnP (V90-x2). Click the
Properties button. Click the Driver tab and click the Update
Driver button. Select Automatic search for a better driver (Recommended)
and click Next. When Windows finds the driver, click Finish
to complete the installation.
Windows XP
Note: Windows XP users must be in administrator mode to properly add any new hardware.
Turn on your computer. Windows will detect your new modem and automatically install it, then you must update the driver. Insert the Installation CD-ROM into your CD-ROM drive. Click Windows Start and Control Panel. Make sure you are in Classic View, and double-click the System icon. Click the Hardware tab. Click Device Manager and then select the Modems tab. Right-click Courier V.Everything Ext PnP (V90-x2) and click Update Driver. When the Hardware Update Wizard appears, select Install from a list or specific location (Advanced) and click Next. Select Don’t search. I will choose the driver to install. Click Next. Click Have Disk. Type D:\ and click OK. If your CD-ROM drive uses a different letter, type that letter in place of “D”. Select U.S. Robotics Courier V.Everything EXT PnP and click Next. A Hardware Installation warning may appear. Click Continue Anyway if it does*. Click Finish to complete the installation.
All Other Operating Systems
Beyond full support of the Windows Operating Systems described in this
manual, the Courier 56K Business Modem will function in any operating
system that supports an RS-232 COM port, such as DOS, Linux, or UNIX.
Standard COM port settings are: bits per second: 115,200; data bits: 8;
parity: none; stop bits: 1; flow control: hardware. Assign your terminal
application to utilize the COM port to which you connect the modem's serial
cable. Additional setup information can be found in the 3453 FAQ section
at http://www.usr.com/support
*U.S. Robotics has thoroughly tested this driver in conjunction with the supported hardware and has verified compatibility with Windows XP and 2000.
Would you like to install the Instant Update software?
Included on the Installation CD-ROM is the Instant Update software. The Instant Update software automatically notifies you of any updates to your modem's code.
- To install the Instant Update software, keep the Installation CD- ROM in your CD-ROM drive. Click Windows Start and then click Run. In the “Run” dialogue box, type D:\setup.exe. If your CD-ROM drive uses a different letter, type that letter in place of “D”.
- Choose the Software option, select U.S. Robotics Instant Update, and then follow the on-screen instructions to install the Instant Update software.
Would you like to install the Internet Call Notification software?
Internet Call Notification lets you take an incoming voice call without dropping your Internet connection.†
- To install the Internet Call Notification software, keep the Installation CD-ROM in your CD-ROM drive. Click Windows Start and then click Run. In the “Run” dialogue box, type D:\setup.exe. If your CD-ROM drive uses a different letter, type that letter in place of “D”.
- Choose the Software option, select U.S. Robotics Internet Call Notification, and follow the on-screen instructions to install the Internet Call Notification software.
† Internet Call Notification is supported in Windows 98, 2000, Me, and XP.
Register your modem.
- At the Installation CD-ROM interface, click the Support link.
- Follow the on-screen instructions to register your modem. Click Windows Start and then click Run. In the “Run” dialogue box, type D:\setup.exe. If your CD-ROM drive uses a different letter, type that letter in place of “D”.